Showing posts with label cakes. Show all posts

Wednesday, 21 October 2020

Halloween Ghost Cupcakes

These are really easy to make and if you want a super quick fix you could even buy some ready made fairy cakes and simply decorate with the kids, but we do like to make ours. 

My two girls absolutely loved making these - they're really fun and are a great little activity to do during half term in the lead up to Halloween.

Halloween Ghost Cakes

Here's how:

For the cakes:

  • 110g caster sugar
  • 110g self raising flour
  • 110g butter (softened/room temperature)
  • 2 eggs
  • 1 tsp baking powder
  • 1/2 tsp vanilla extract

To decorate:

  • Ready made orange or black Halloween icing/frosting (I bought ours in B&M)
  • 1 sheet ready rolled Royal Icing
  • 12 large marshmallows
  • 1 black icing pen and 1 red, orange or pink (for the mouths)

Firstly pre-heat the oven to 200 degrees and line a cupcake tin with 12 cake cases - we used some leftover Halloween ones from last year which I picked up in Poundland no less.

Use the all-in-one method for the cakes, which means add all of the ingredients (self raising flour, caster sugar, butter, eggs, baking powder and vanilla extract) into a large mixing bowl and mix with a wooden spoon well until you have a good, combined cake batter.

Now spoon equal amounts into the cake cases, we use the two teaspoon method (spoon with one teaspoon and scrape down into the case with the other). 

Place into the oven for 15 minutes or until risen and golden brown then remove from the oven and allow to cool for 20-30 minutes on a wire rack.

To decorate, add a tablespoon of the ready made icing/frosting to each cupcake then use a palette knife to spread all over the top of the cake, into the edges of the case. 

Now place a marshmallow on top longways (the longest side should be flat to the cake) in the middle of the cake to make the body of the cake.

Now take out the Royal Icing Sheet (if you can't get a sheet, but a block and cut a third off and roll out, and wrap up the remaining Royal Icing which should keep for up to a month). Use a round cookie cutter to cut out x12 rounds big enough to go over the marshmallow with a little to spare. 

Place each icing round on top of the marshmallow and use your hands to pinch it down to the cake icing and form a ghostly appearance. 

Once all of the 'ghosts' are formed you can pipe or ice on the eye dots and a little line for the mouths. Enjoy!

If you fancy making more Halloween treats with the children here are a few other ideas:

Wednesday, 17 June 2020

Double Chocolate Brownies

This is a straight-forward Double Chocolate Brownie recipe that is fabulous to make with children and loved by the kids and grown-ups alike. 

This makes enough for x8-10 thick brownies and they can last a few days in a sealed container, but they rarely do. We made them on Sunday morning and enjoyed for our dessert that day. 

Double Chocolate Brownies


Here's how:

  • 200g dark chocolate
  • 190g salted butter
  • 80g plain flour
  • 50g cocoa powder
  • 275g caster sugar
  • 3 eggs
  • 200g milk chocolate

Firstly pre-heat the oven to 180 degrees and fill and boil the kettle. In the meantime, grease and line a square baking tin with grease proof paper and set aside.

Now place the just boiled water into a small saucepan and above it place a heat-proof dish to melt the dark chocolate in. Break up the dark chocolate and place into that bowl with the salted butter. Allow this to slowly melt down until you are left with what can only be described as chocolate lava. Now remove from the heat and set aside. 

Take the milk chocolate bar, and cut into chunks and set aside.

In a large bowl, mix together the caster sugar and eggs; use a whisk and really be quite vigorous to get as many air bubbles into the mixture as possible (this will help the brownies to rise). 

In a different, smaller bowl, combine the flour and cocoa powder, pass through a sieve. 

Now take the chocolate lava mixture and gently pour into the beaten eggs and sugar, and gently fold in using the figure of eight method. You don't want to knock out all of the air, so do this carefully. 

Now repeat the process by adding the flour and cocoa into the bowl, and again gently folding it in until it's all combined. 

Finally add most of the chocolate chunks, and stir through. Then pour the brownie batter into the baking tin and allow it to be as evenly distributed as possible. Now place each remaining piece of chocolate all over the top of the batter. 

Place into the hot oven for exactly 28 minutes, then remove and leave on the hob, in the tin for at least an hour to cool right down before you attempt to remove it from the tin. When you do, cut into your preferred number, and leave in a cool dry place in a sealed container until ready to serve. You should have rich, fudgey, moist brownies that are utterly delicious. 

Double Chocolate Brownies
Here are a few other baking recipes you may enjoy making:

Friday, 2 August 2019

Triple Chocolate Cookie Brownies

I made these yesterday for the end of the dance term for a tasty teacher gift and it's the first time I've made them in a while. This recipe works with any chocolate-based biscuit - I've used Bourbon's before, or even chocolate chip cookies but we love the look and taste with these Oreo style cookies - (although I actually bought the Neo biscuits, which are a cheaper copy from Lidl).

They are super rich and the extra chocolate chunks plus the cookies mean these are a real squishy, fudgy treat - delicious.

Triple Chocolate Cookie Brownies


Here's how:

  • 200g dark chocolate (at least 70% cocoa solids)
  • 185 salted butter at room temperature
  • 80g plain flour
  • 50g cocoa powder
  • 3 eggs
  • 275g caster sugar
  • 100g white chocolate
  • 100g milk chocolate
  • 1 pack Oreo or Neo (or alternative) cookies


Firstly pre-heat the oven to 180 degrees, fill and boil the kettle and then grease and line a baking tin with greaseproof paper. 

Using the just-boiled water, place into a small saucepan and in a bowl that rests on top of the saucepan, add the butter and the dark chocolate, broken into small pieces. Allow this to gently melt until it is a liquid lava of chocolate and then remove the bowl from the heat and allow to cool whilst you get everything else prepared. 

Chop the chocolate into small chunks and set aside. Also break about half of the cookies up into small pieces either by hand or by chopping and also leave to the side for the moment.

In a small bowl sift in the plain flour and cocoa powder. 

In a mixing bowl add the caster sugar and eggs and begin to whisk. This  is the most laborious part of the process - you need to work this quite hard to get as many bubbles in there as possible to allow the brownies to rise up. The final mixture should be light and fluffy and full of bubbles - do at least six minutes of whisking if doing by hand, and of course, take breaks if you need to.

Once you are satisfied, remove the whisk and grab a wooden spoon; now gently pour in the melted chocolate and butter into the bowl, and slowly fold in the mixture - be as gentle as you can to try and not whack all of the air out of the batter. 

Once this is combined, repeat the process with the flour and cocoa - use the figure of eight folding method if you can.

Finally add the chopped pieces of chocolate to the batter and mix to distribute well.

Now pour in half of the brownie batter into the baking tin. Now carefully scatter or place in the broken pieces of biscuits into the batter so they are evenly distributed. 

Triple Chocolate Cookie Brownies


Pour the remaining half of the batter over the biscuits so they are completely covered.

Finally take the remaining, whole Oreo/Neo biscuits and place neatly across the batter just on top - I try to keep one for each piece or portion of brownie. 

Once complete, place into the oven and bake for exactly 28 minutes - this timing works every time in my oven, which can be quite fast compared - so if you're unsure, use the skewer method to see if it comes out dry - if so it's done, if not return to the oven for a few more minutes, then test again.

When you remove from the oven give the tin a bang - this will make it easier to extract the brownies. 

Triple Chocolate Cookie Brownies


Leave to cool for as long as possible - it can be difficult when the kitchen is filled with an intoxicating chocolate aroma, but you'll thank me for it, when you're able to cut into neat squares. If you can't wait (we usually can't either) then be prepared for slightly more rustic brownies, with scruffier edges. Either way it won't impair the taste - enjoy!.

Thursday, 13 June 2019

Lovely Lemon Cake

This citrus cake is light and delicious with a triple hit of lemon running through it from the sponge cake, the lemon curd and the lemon buttercream. It's perfect for a celebration cake.

It's simple to make too - I've used the all-in-one method for the sponge which works every time.

Lovely Lemon Cake
Add caption


Here's how:

  • 250g salted butter
  • 250g self-raising flour
  • 250g caster sugar
  • 4 eggs
  • Zest of 2 lemons
  • 1 drop of Sicilian lemon extract
  • 2-3 tsp milk 
  • 1 tsp baking powder


For the buttercream:

  • 180g salted butter
  • 500g icing sugar
  • Juice and zest of 2 lemons
  • 1 drop Sicilian lemon extract
  • 3 tbsp lemon curd
  • Lemon Jelly Slices (I use Morrison's from the baking department)

First pre-heat the oven to 180 degrees and grease and line two 20cm sandwich tins. 

Into a large bowl measure the flour, softened butter and sugar and baking powder and mix well to combine. Add the lemon zest and extract and once well mixed, add a drop of milk at a time until you have a thick and unctuous cake batter at a consistency you're happy with. 

Now carefully divide the cake batter between the two sandwich tins, level out and place both into the hot oven for 20-25 minutes or until golden brown and risen.

Test the cake with a skewer - as long as it comes out dry the cake is good to go.

Leave the cakes to cool in the tins for 20 minutes, then carefully remove and place onto a board to cool further.

Now begin to prepare the lemon buttercream - ensure the butter is soft, and if not place into the microwave for 10-15 seconds. Add the icing sugar, the lemon juice, zest and extract to the butter and mix well. Once all combined you can begin the assemble the finished cake.

Place one sandwich at the bottom and spoon over a few tablespoons of the lemon buttercream - use a palette knife to spread so it's evenly distributed.

Now spoon over the lemon curd and spread around - it doesn't need to be too neat but try to get an even spread.

Place the second sandwich on top of the first. 

Now spread the buttercream over the top and the sides of the cake all around. Again, use a palette knife to spread and make as neat as possible. 

If using the Lemon Jelly Slices simply place them all around the outside of the cakes' top and you're done. 

The cake will last for up to a week if covered and kept in the fridge but it never lasts more than a day or two around here.

If like me you're partial to a fruity cake here are a few other recipes you might like:


Thursday, 2 May 2019

Plain Scones

Cream Tea at Home

If you enjoy a cream tea, and like baking, then a simple scone recipe is a great one to have in your cooking armoury. 

You'll be surprised at how easy these are to make, and if you serve them slightly warm, they are just to die for. Buttery, crumbly and delicious - especially with a cup of tea.

As we are heading to Cornwall very soon, I served these the Cornish way; jam first, then the Roddas Clotted Cream - just perfect.

Plain Scones
Plain Scones

Here's how:
  • 375g self raising flour
  • 1 tsp baking powder
  • Pinch of salt
  • 95g butter - room temperature, and cut into cubes
  • 3.5 tbsp caster sugar
  • 1 tsp vanilla
  • 190ml milk (use full fat)
  • 1 drop of lemon juice
  • 1 beaten egg to brush over before baking
  • Roddas Clotted Cream and some Strawberry Jam to serve

Firstly pre-heat the oven to 200 degrees and get a baking sheet ready - line it if you wish.

In a large bowl tip in the self raising flour, the salt and the baking powder and mix a little.

Now add the butter cubes into the bowl and use your hands to rub the mixture together, until it resembles breadcrumbs.

At this point add the sugar and mix well.

Measure out the milk into a small jug or bowl and add the vanilla then pop into the microwave for twenty seconds to take the chill off of it. 

At this point pop the baking tray into the oven to warm up as you want to place the uncooked scones onto a hot surface.

Now make a hole in the middle of the flour in the large bowl and pour in the liquid as well as the drop of lemon juice.

Use your hands to bring everything together, it will be quite wet to begin but will soon come together as a dough.

Once it is a dough consistency, scatter some more flour over a clean work surface and place the dough onto it. Use your hands to fold over the dough 3-4 times, until it is quite smooth. Be careful not to overwork it here.

Use your hands to then smooth it out into a flat piece of dough, it doesn't need to be perfectly straight or flat, just a similar thickness, about 3-4cm deep.

Now take a round cutter and make 4-6 scones. With any excess dough bring back together and press down and you can make another scone. 

Now quickly beat an egg and then remove the hot baking sheet from the oven. 

Place each scone onto the tray and brush over the beaten egg.

Place into the oven and bake for 10 minutes until they are golden brown and well risen.

Serve warm with your choice of clotted cream, jam or even butter. Enjoy!

If you enjoy simple bakes here are a few other ideas you might enjoy:


Wednesday, 10 April 2019

Rhubarb and Custard Cake

I made this cake for the first time on Sunday as an experiment as my parents were coming for dinner and both my Dad and I absolutely adore rhubarb. It made a completely delicious dessert served with good vanilla ice cream.

It had a tartness from the rhubarb but was well balanced with the sweet custard-flavoured cake batter and I’ll be sure to make it again. I mean, who doesn’t have a fondness for the combination of rhubarb and custard.

We eat the entire cake in one sitting between the six of us so that should give an indication of the reception it got. I will say it looked a little over-brown and charred when it came out of the oven, but it really did taste great.

I took inspiration from The Australian Women’s Weekly The Cake Stall recipe book which I was gifted a long time ago; but I made a cheat short-cut in adding ready-made custard instead of making my own. This added a thicker baked custard-like texture and just sped up the process (I was painting garden fences whilst preparing dinner on Sunday).
 Feel free to make your own custard though if you have plenty or time. 

Rhubarb and Custard Cake


Here’s how;

  • 4 rhubarb stalks
  • 110g Caster sugar
  • 200g Softened butter
  • 185g Self-raising flour
  • 3 tbsp custard powder
  • 3 eggs
  • 1 carton or tin of ready-made custard
Firstly pre-heat the oven and grease and line a small but deep tin.

Now prepare the rhubarb stalks by cutting the ends off and then slicing length-ways down the rhubarb and setting aside.

In a mixing bowl cream together the sugar and softened butter until thick and creamy, then add the eggs, beating them in one at a time.

Next combine the flour and custard powder and sift into the wet mixture and mix until all is combined.

Now pour about half of the cake mixture into the bottom of the tin and smooth across so it’s evenly covering the base.

Now take a few of the rhubarb stalks and place them gently into the cake batter.

Next pour over the custard, and then finally spoon on the remaining cake batter and carefully spread over the custard.

For the final thing before baking, gently place the rhubarb on top of the cake batter, and press lightly down.

Place into the oven for 45 minutes, then test with a skewer to ensure when prodded the skewer comes out dry. If not return to the oven for a further ten minutes.

Serve with vanilla ice cream or even more custard.

For more baking inspiration here are a few other cake recipes you might like:


Tuesday, 2 April 2019

Carrot Cake

This is a lovely carrot cake recipe that results in a moist, delicately spiced and delicious cake that is packed with nuts and fruit and is simply perfect with a cup of tea or coffee.

We made it for a little treat for my Mum on Sunday morning for Mother’s Day and we all enjoyed a slice after dinner. 

Carrot Cake


Here’s how:
  • 240ml vegetable oil
  • 2 heaped tbsp Greek natural yoghurt
  • 3 large carrots (about 270-300g)
  • 4 eggs
  • 1 tbsp vanilla extract
  • Zest of 1 lemon
  • 265g self-raising flour
  • 350g light muscovado (brown) sugar
  • 1/2 fresh nutmeg
  • 2.5 tsp cinnamon
  • 115g dried mixed fruit
  • 115g chopped walnuts (plus a handful for decorating)

For the icing:
100g softened salted butter
100g soft cream cheese
300g icing sugar
Drop of vanilla

Firstly preheat the oven to 180 degrees and grease and line two 20cm baking tins.

Peel and grate the carrots and set aside for the moment.

Zest the lemon, roughly chop the walnuts and if there are any large pieces of fruit in your dried fruit mix, halve them.

Now in a small bowl or jug, whisk together the yoghurt, oil, eggs, vanilla and lemon zest until well combined and smooth.

In a large mixing bowl add the self raising flour, the sugar, nutmeg and cinnamon and mix together roughly. Try to smooth out any large bits of sugar.

Now add the oil, yoghurt and egg mixture to the flour and sugar with the carrots and mix well until it comes together as a lovely brown batter.

Now add the nuts and fruit and mix in and then divide between the two baking tins.

Place into the middle of the oven and bake for 25 minutes. Test with a skewer or cocktail stick when they come out of the oven and if they come out clean, they’e done, if not return for the oven for five more minutes.

Remove from the tin and place on a board or wire rack and allow to cool for at least thirty minutes.

For the icing simply combine all of the ingredients and whisk fairly hard until you have a smooth creamy texture.

Once satisfied with the consistency, add 2 tbsp of the mixture to the top of the bottom layer of the cake and use the back of a spoon or a palette knife to spread as evenly as possible.

Now place the second layer on top, and repeat the process with the remaining icing until the top is covered. Try to smooth it over so it is quite even.

Finally decorate with the remaining walnuts - I like to go around the edges with walnut halves, but any pattern is fine. Enjoy!

Saturday, 13 October 2018

Sweet Drip Cake

Sweet Drip Cake

I'd like to begin by saying that I made this with absolute pleasure for Bridget's fourth birthday cake. It was by no means perfect in terms of appearance compared to some of the Insta-delicious and Pinterest-perfect creations I sought inspiration from (Ange des Sucres, Rosie's Dessert Spot, The Kitchnn I'm looking at you!) . Having said that, it tasted fantastic, was enjoyable to make and my two little girls were delighted with it. 

The drip icing was quite difficult to master, and master I didn't, my 'drips' were rather large compared to the desired result, but again, I was pretty chuffed with the end result.

I made a very simple all-in-one Victoria Sandwich cake filled with raspberry jam and then iced it with a simple buttercream. 

For the drip effect having referred to various sites and resources online, I chose a white chocolate ganache with a little food colouring to give the peachy colour required. Making it into gloriously unctuous and glossy icing was actually quite easy, but I think a few more attempts before I get the neat and tidy drips.  

The fun thing with these cakes is you can top them with all of your favourite sweet things, I used an array of jelly sweets, some Party Ring biscuits, pink macarons, pink wafer biscuits, marshmallows and a couple of lollipops but the choice is endless.

Here's how:

The sponges: 

  • 225g butter
  • 225g caster sugar
  • 225g self-raising flour
  • 2 tsp baking powder
  • 4 eggs
The filling
  • 3 tbsp raspberry jam

The buttercream:

  • 300g salted butter
  • 500g icing sugar
  • 1/2 tsp vanilla extract
  • Tiny drop of peach food colouring

The ganache drip icing:

  • 160g white chocolate
  • 140ml double cream
  • 3-4 drops of peach food colouring
The sweet toppings:
You can use a combination of any of your favourite sweet things, I used:
  • Rose macarons
  • Pink wafer biscuits
  • Party Ring mini biscuits
  • Jelly sweet assortment
  • Marshmallows
  • Lollipops

Firstly pre-heat your oven to 180 degrees and then grease and line two 20cm sandwich tins with parchment paper. 

As this is an all in one cake add all of the ingredients to a large bowl or mixer (sift the flour) and mix well until completely blended. Pour half of the mixture into each of the sandwich tins and then level out as best you can so they are fairly even. Pop into the oven to bake for 20 minutes, or until they have risen and bounce back if pressed lightly with a finger. You can use a skewer to check if they are baked through, if you spear the cake and it comes out dry you know they are ready.

It's important that you completely cool the sponges before icing so be sure to turn out onto a wire rack or if you haven't got one a flat chopping board will suffice just as well. Set aside and cool for at least an hour.

I like to prepare my cake on a cake stand, but if you have a cake turner this will be great here, or a simple plate or board is also fine. 

Spread the jam generously onto the top of one of the sponges - don't scrimp here, this is an indulgent cake.

Now carefully and as evenly as you can muster, place the second sponge on top of the first sponge.

Firstly make the ganache icing so it has a little time to cool. Break up the white chocolate and place into a heavy-bottomed pan with the cream and place on a low heat. Stir continuously with a wooden spoon until fully melted and glossy. Do not allow to boil. Once you're happy with the consistency, remove from the heat and add the food colouring of your choice and stir through to ensure you're happy with the colour of the icing. Set aside for a while so you can make the buttercream and cover the cake.

To make the buttercream combine all of the ingredients and mix well until thoroughly blended and smooth - you don't want to see lumps here. 

Now you want to cover the cake and then use a pallette knife to smooth the icing around the cake. You want as smooth a finish as possible here as it fits the style, and particularly the top does need to be as flat as possible. Once you are happy set aside for the moment.

Sweet Drip Cake before the ganache


Once the white chocolate ganache is cool to touch, you can begin the icing work here, give a good stir and you're ready to begin.

Firstly spoon on some icing at the edge of the cake, a good tablespoon, then gently push a little over the edge to create your first drip. Repeat this process all around the cake until you have lots of drips and then spoon over the ganache on the top of the cake and ensure it is covered on the top.

Now decorate with your choice of sweet things in any design you fancy. This is the time for fun and indulgence so don't hold back. I added a gold 4 candle to mine, and you could do the same with the appropriate age or even add a sparkler or any other kind of decoration to add to the fun of this sweet drip cake. Enjoy!


Sunday, 29 July 2018

Mary Berry's Marbled Chocolate Ring Cake

My daughters love to cook with me but over all else, they love to bake. This morning, before heading out for the weekly shop, I gave my eldest, Bridget, Mary Berry's Baking Bible to rifle through and select something for us to bake together this afternoon - she chose this Marbled Chocolate Ring Cake.

It is a fairly simple bake and results in a lovely crumbly texture with a rich iced finish. It went down incredibly well in our household - whilst I'm more of a Lemon Drizzle Cake girl, everyone else loves a chocolate cake.

I took this from Mary Berry's Baking Bible in the 'chocolate cakes' section - aside from a couple of very minimal modifications, this is Mary's to the letter.

Mary Berry's Marbled Chocolate Ring Cake

Here's how:


  • 225g softened salted butter
  • 225g caster sugar
  • 225g self raising flour
  • 4 eggs
  • 2 teaspoons baking powder
  • 1.5 level tablespoon cocoa powder
  • 1.5-2 tablespoons warm water


For the icing:

  • 150g dark chocolate
  • 2 tablespoons water
  • 100g butter
  • 80g milk chocolate


Firstly pre-heat the oven to 180 degrees and grease a 3 pint ring mould generously. I use a silicon mould as find them easier to remove cakes from after baking that metal tins.

Omitting the cocoa powder and water - place everything else into a mixing bowl and fold in and mix well.

Once everything is well mixed, take a tablespoon and place 1 scooped tablespoon of the cake batter in the mould, and then repeat around the circular mould with small gaps in between each mound of batter. Use about half of the batter - this will help with the marbled effect.

Now pop the cocoa into a tea cup or mug and add the water and mix well, to an almost paste like consistence. Now add this to the remaining cake batter, and spoon over the batter in the gaps and all around until it is all in the mould.

Place the mould onto a baking tray and into the oven for 30-35 minutes. Test with a skewer that the cake is cooked through, and if so remove and leave in the mould for 5-10 minutes to cool a little. Then turn out carefully to cool completely - I place onto a wide chopping board as it's an easy place to ice the cake shortly.

For the icing, break the dark chocolate up and place into a bowl, with the butter and water. Place above a small saucepan of boiling water and allow to slowly melt, stirring with a wooden spoon to help it on its' way.

Once melted, it should have a beautiful glossy sheen to it, then spoon or pour over the cake to completely cover it. Now set aside somewhere cool and allow it to set for about an hour.

For the final part, break the milk chocolate into another bowl, and then place above the saucepan with recently boiled water. Once melted, transfer it to your piping vessel - you can of course use a piping bag, but I don't have much luck with them, so I just used a food bag and snipped a small hole in it.

Then finally drizzle over the cake in any pattern you'd like - the beauty of a homemade cake is the rustic appearance so let the children get involved and go crazy. Enjoy! 

Here are some other cakes and bakes you could attempt with your children as an activity during the holidays:
Simple Double Chocolate Traybake
Lemon Drizzle Cake
Guilt Free Apple Cake
Pig Face Cupcakes
Chocolate Cornflake and Marshmallow Cakes
Banana and Berry Breakfast Muffins
Deliciously Ella Sweet Potato Brownies
Monte Carlos Biscuits
St. Clement's Drizzle Cake


Monday, 24 July 2017

Lemon and Honey Yoghurt Cake with Blueberries

 
Bridget with her masterpiece - the Lemon and Honey Yoghurt Cake with Blueberries
Yoghurt cakes are a favourite in this household, they keep moist for longer than other cakes and can keep for a week or so in the fridge; if they don't get eaten sooner.

This one is flavoured with honey and lemon and I make it in a silicone bundt mould with blueberries popped onto the base, which makes a beautiful, squished blue and purple topping once baked; irresistible. With a quick lemon icing to finish the cake, it's always a crowd pleaser. You can play around with other fruits too but blueberries go really well with the lemon.

My eldest daughter, Bridget is almost three and absolutely loves cooking with me, and particularly baking. I think it's a great, sensory activity for children of all ages, and love the thought that I am instilling into her an interest and indeed, a passion for food and cooking. Today's bake is our first 'big' one together, outside of biscuits, cupcakes and fairy cakes, and I was so pleased it turned out so well to see her little happy face.  

Lemon and Honey Yoghurt Cake with Blueberries


Here's how:

  • 325g caster sugar
  • 60g butter
  • 3 large eggs
  • 230g Greek Natural Yoghurt
  • Rind of one lemon
  • 2 tbsp honey
  • 175g self raising flour
  • 100g blueberries
  • drizzle of vegetable or rapeseed oil

For the icing:
  • 150g icing sugar
  • Juice of 1 lemon

Firstly pre-heat the oven to 180 degrees and lightly grease your bundt mould or tin with the vegetable or rapeseed oil. (Obviously you can use a different shaped baking tin if you don't have a bundt). If using a silicone mould, like myself, place onto a baking tray or tin.

Pop the blueberries into the base of the bundt (or other) mould, no particular pattern, just try to evenly spread them around.


Separate the eggs, with the yolks being popped into a large mixing bowl and the whites into a smaller one.

Now add to the egg yolks the butter and sugar and beat until smooth. Add the rind of the lemon and the yoghurt and mix well. Now stir through the honey.


Now beat the egg whites until soft peaks are formed and there are lots of bubbles, to ensure a good rise. Now slowly fold the egg whites into the cake batter.

Finally pour the batter into the cake mould, even out as much as possible and then place the mould into the centre of the oven.


Bake for 45 minutes or until golden brown, and when pricked with a skewer, it comes out dry.

Leave to cool for 20 minutes before turning out onto a cake stand or plate, and once turned over, gently peel the mould away.

Lemon and Honey Yoghurt Cake with Blueberries pre-icing


To make the icing, simply sift the icing sugar into a small bowl, and juice the lemon and mix well. You should be left with a thick, glossy, white icing. Use a spoon to drizzle over the top - be warned if making this with a little person, like Bridget, expect this to become a bit of a sticky mess, but it only adds to the fun. For a final flourish, add the leftover lemon zest over the top of the icing.

Lemon and Honey Yoghurt Cake with Blueberries


Leave the icing to set for thirty minutes or so, and then serve, preferably with a mug of tea. Enjoy!

Some other cake ideas that might be fun to make with your little ones:
Guilt Free Apple Cake
Pig Face Cupcakes
Double Chocolate Traybake
Chocolate Cornflake and Marshmallow Cakes
Lemon Drizzle Cake
St Clement's Drizzle Cake
Lemon Curd and Blueberry Muffins
Chocolate Olive Oil Cake

Tuesday, 18 October 2016

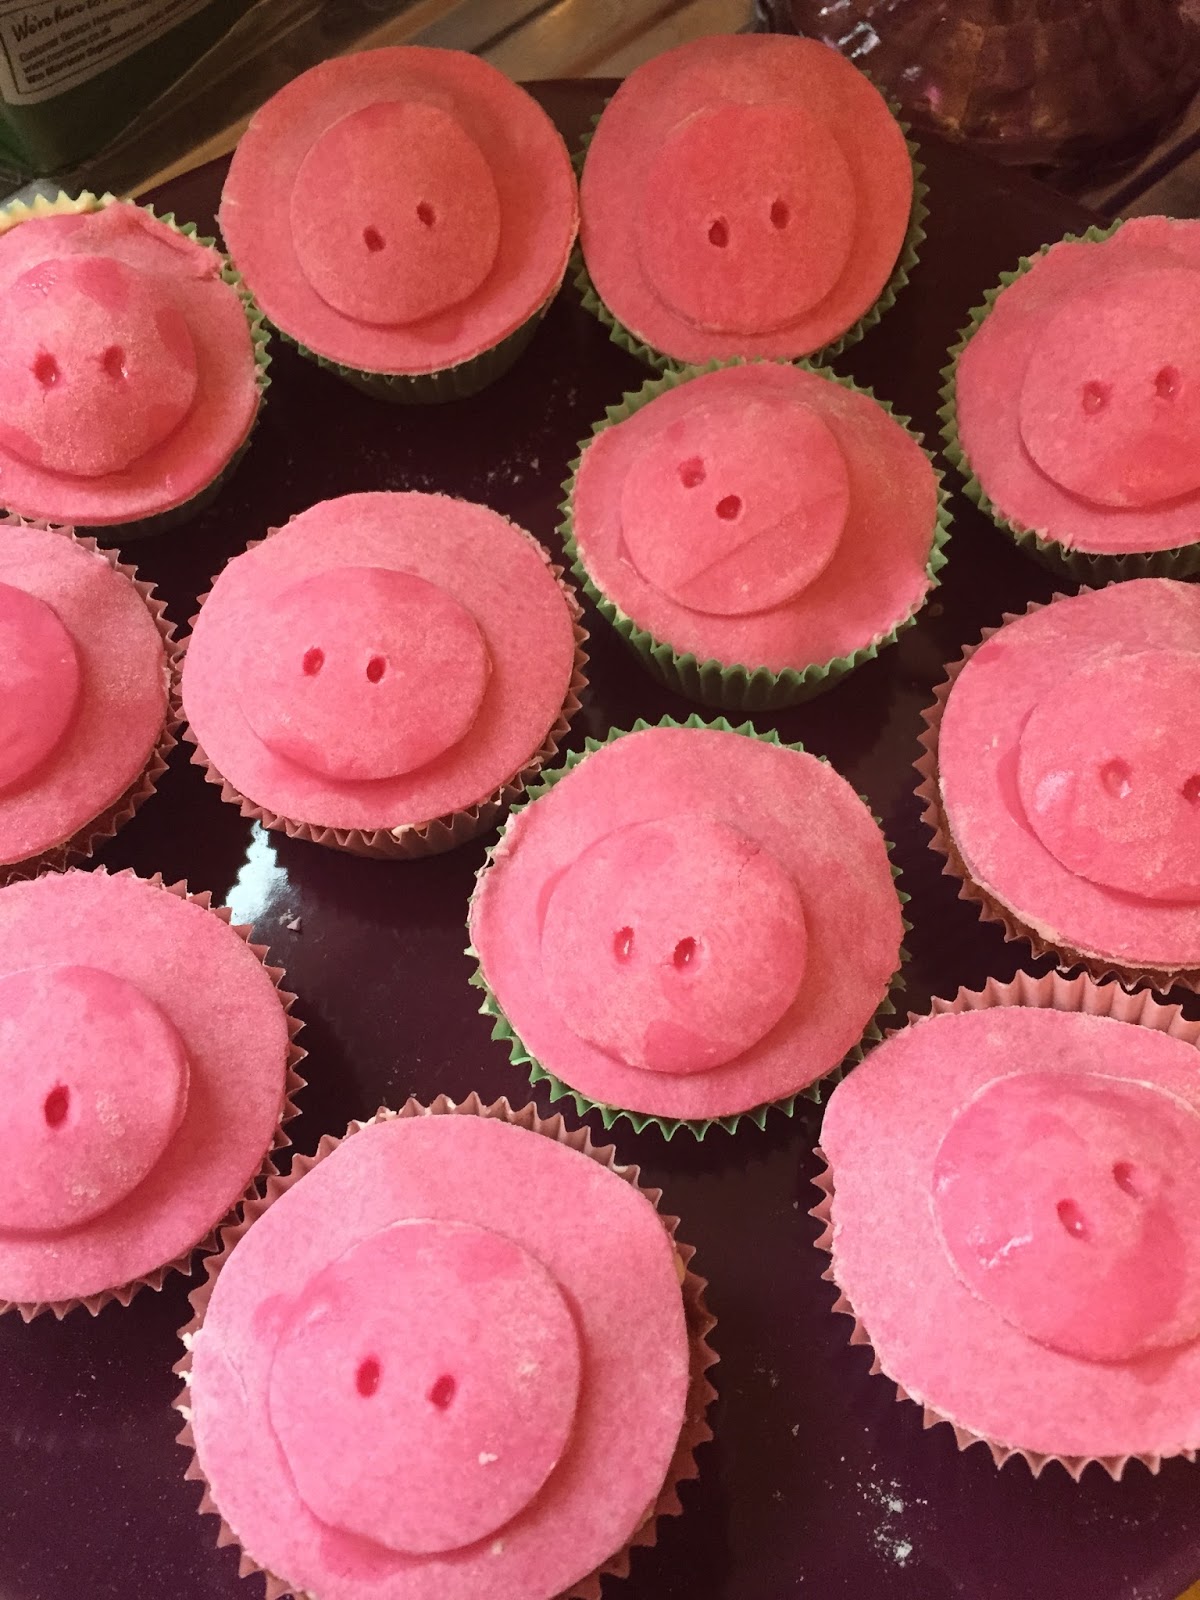
Children's Party Food: Pig Face Cupcakes

As we recently celebrated Bridget's second birthday and she is somewhat obsessed with Peppa Pig, I decided to make her some Piggy based cakes - with some inspiration stolen from Pinterest - where there are some pretty elaborate and impressive versions!

I have to say, whilst I'd say I'm a competent cook and baker - I'm lacking somewhat in the artistic presentation stakes - not through want of trying, I just express my creativity differently. So I went for something simple that still looked piggy and relied on cookie cutters and a tiny bit of shaping of fondant - if I can do it, so too can most children! And whilst this is great party food it could also work as a fun baking activity with your children - perfect for a rainy day activity or cold and wintery afternoon distractions.

I used the classic cupcake or fairy cake recipe that I've used time and time again, from Mary Berry but doubled up and used half the mixture for making the Peppa Pig Rice Paper Cupcakes.

For the whites of the eyes, if you have a steady hand you could pipe on some buttercream, but I found using fondant icing slightly easier for my not-so-steady hands.

Once the cupcakes were cooled enough to take on the fondant here is how I made them into little piggies.

Pig Face Cupcakes

Here's how:

1 batch Mary Berry basic cupcakes slightly cooled (Use the all-in-one method to combine: 175g each; slightly softened butter, self-raising flour, caster sugar, 3 large eggs, 1 tbsp vanilla extract, ½ tsp baking powder)
1 pack pink fondant icing (I used Renshaw's)
1 pack white fondant icing (Renshaw's)
1 black icing pen (could also use those sugar balls instead)
1 tablespoon icing sugar
Drop cold water

Firstly find a round cookie cutter that will be almost big enough to cover the entire top of each cake and set aside. Now find a smaller round cookie cutter for the nose and set this aside also.

Now make sure you use a completely clean and dry worktop space to very lightly flour, then flour a rolling pin and roll out the pink fondant icing until it is about 1/2cm thick.
Cut out the number of toppings you require for your cupcakes (I did 18).Combine the icing sugar and water in a small cup and mix well. Use a pastry brush to top each cake with a little icing then secure a topping on each cake.

Pig face cupcakes

Now make the noses using the smaller cutter. Using a sharp skewer make two nose holes in each, you can go all the way through.

Pig face cupcakes

Now place a little icing onto the back of each nose then gently tap it down into the centre of each pig's face.

Now using a tiny ball of pink icing for each pig, roll out a little pair of ears for each and set aside for the minute.

Now get the white fondant icing and cut off a quarter of it - that will be sufficient. Roll this out and then create 18 pairs of small, white balls for eyes, then flatten them onto each pig's face, securing with a tiny bit of icing and hold down. You won’t require all of the icing – secure the rest in a sealable bag and this will keep for a while in the cupboard.

Now use the same method to secure the ears on top of each pig's face.

Finally, use the black icing pen to drop a tiny dot or 'pupil' onto each eye.

If kept in a sealed container these can keep for a couple of days - perfect if you've got a lot of party preparation to get on with. Enjoy!

The piggy corner

Wednesday, 29 July 2015

Lemon Curd and Blueberry Muffins

These are a lovely baked treat of twelve muffins - you can use lemon curd or blueberry jam as I have here, but they work equally well with other jams too and are utterly delicious with a cup of tea.

They are a perfect distraction for children to make during the summer holidays too and a great introduction to baking. They are also very easy to make just needing a basic muffin recipe.


Here's how:

  • 150g caster sugar
  • 200g self raising flour
  • 1 egg
  • 75ml olive oil
  • 160ml milk
  • 1 tsp vanilla extract
  • 75g lemon curd
  • 75g blueberry jam
  • Handful of blueberries to decorate


Firstly pre-heat the oven to 180 degrees. Also line a muffin tin with twelve muffin cases.

Sieve the flour into a bowl and add 100g of the caster sugar.

In a separate bowl mix together the vanilla, olive oil, milk and egg and once combined slowly mix into the dry ingredients.

Once completely combined half fill each muffin case with some mixture. Now put a teaspoon of lemon curd into half of the muffin cases and a teaspoon of blueberry jam into the other six. Now finally top each muffin with more muffin mixture to cover the jam and lemon curd.

Place into the oven to cook for 12-15 minutes or until golden brown and nicely risen.

Remove from the oven and set aside.

With the remaining lemon curd, place into a ramekin or small bowl and place into the microwave for ten seconds or so to completely melt. Then using a pastry brush, brush the six lemon curd-filled muffins with the melted curd. Now scatter half of the remaining caster sugar.

Now repeat the process with the blueberry jam - melt in the microwave and brush over the remaining muffins and then scatter with sugar. Then use the blueberries to decorate. 

These will keep in a cake bow for two days but are best served warm with a cup of tea.