Wednesday 14 September 2016

Toad in the Hole

In honour of tonight’s Great British Bake Off and the first ever ‘Batter Week’, I was inspired on Monday to cook one of my favourite family dinners; Toad in the Hole, a hearty batter pudding with good sausages.

This meal is incredibly simple to prepare, and is such a comforting dish, it transports me straight back to my childhood.

I use my mother’s fail-proof recipe for a Yorkshire or batter pudding, with some dried thyme as an added, tasty extra (my Mum would not approve of tempering with a classic I’m sure) and it has yet to fail me. Mum swears by making the batter at least an hour before cooking and leaving to stand – as it has never let me done, I’ve stuck with her advice.

This week I served with some sweet potato mash and lots of vegetables – but I forgot how filling it is, you could easily have it with just a selection of vegetables, and of course some thick, delicious gravy.

Toad in the hole

Here’s how:
  • 150g plain flour
  • 1 tsp mustard powder
  • 1/2 tsp dried thyme
  • Pinch sea salt
  • ½ tsp black pepper
  • 2 eggs, 1 egg yolk
  • 300ml milk
  • 1 tbsp olive oil
  • 4-6 good quality, thick sausages

Firstly make the batter by combining the flour, mustard powder, thyme, salt and pepper and mixing well in a small bowl or jug. Now use a spoon to make a well in the centre and then crack in the two eggs, and the egg yolk and use a fork or whisk to combine, adding a bit of the milk at a time until you have a fairly thick batter. Now cover and set aside for an hour (or less if you’re in a rush). 


Pre-heat the oven to 180 for 15 minutes. Now place the oil in an oven proof dish and rotate to ensure the base is covered, then place the sausages in and cook for ten minutes in the centre of the oven.

Remove the dish, and the oil should be incredibly hot and sizzling, pour in the batter around the sausages (try not to pour over the top for a better finish) and then return the dish to the oven. Don't be tempted to open the oven mid-way through as this will prevent the good rise you want.


Cook for 30-35 minutes or until the pudding is well risen and golden brown – your final result should be slightly crisp on the outside and fluffy on the inside – delicious.

Toad in the hole

Use a palette knife around the outside to just gentle release, then cut into portions and serve with your choice of accompaniments. Enjoy!

Toad in the hole

Buttermilk Fried Chicken

Recently the infamous secret blend of eleven secret herbs and spices that makes the chicken from KFC so moreish was leaked all over the internet, and I must admit I am due to host all of the family to trial the recipe and see if it matches up that of the fast-food chain favourite - I'll be sure to post the results here.

For now, however, after a few years of trial and error, here is my own preferred version of Buttermilk Fried Chicken.

Buttermilk Fried Chicken

I have experimented a lot taking inspiration from BBC Good Food, Jamie Oliver, Martha Stewart and a whole range of American blogs and websites, but this combination seems to go down the best - especially when served with crunchy homemade slaw and macaroni cheese.

Buttermilk is quite easy to come by in supermarkets these days, but you can make your own by combining the required amount of natural yoghurt with a tablespoon of lemon juice or even vinegar.

I use a dry brine rather than wet, but I then marinate further in the buttermilk for a couple of hours at least, to ensure the chicken is really tender and moist on cooking.

It may seem a lot of effort to marinade overnight and then for a further couple of hours but once you make this the once, I guarantee you'll be back for more. This does pack a punch so to make a milder version cut down on some of the spices and leave out the tabasco from the buttermilk marinade. We made some goujons from chicken breast for Bridget and she liked them though, so it depends on your taste buds.

This is one of the naughtiest recipes I make at home, and one of the most happily devoured, it really is delicious but best to avoid if you are on any kind of diet - this is definitely a 'once in a while' kind of dish.

Here's how:
  • 4 pieces if chicken, thighs are best but you can use drumsticks
  • 1 litre rapeseed, vegetable or ground nut oil

The dry brine:
  • 1 tsp black pepper
  • 1 tsp sea salt
  • 1 tsp paprika
  • 1 tsp cayenne pepper
  • 1 tsp celery salt
  • 2 tsp dried thyme
  • 1 tsp garlic salt
  • 4 bay leaves
  • 1/2 tsp mustard powder
  • 2 tbsp brown sugar
  • Zest of 1 large or 2 small lemons

The wet marinade:
  • 1 tub of buttermilk (250-300ml)
  • 1 tsp tabasco
  • 1 tsp Worcestershire Sauce
  • Juice of half a lemon
  • 4 cloves garlic, peeled and halved

The flour coating:
  • 220g plain flour
  • 3 tbsp cornflour
  • 1 tsp garlic salt
  • 1 tsp paprika
  • 1 tsp cayenne
  • 1 tsp black pepper.

Firstly in a small bowl combine all of the dry brine ingredients. Now place the chicken into a marinade bag or bowl and scatter over the brine. Try to ensure each piece gets a good coating by using your hands to rub in. Now zip up and place into the fridge overnight, or for a good 10-12 hours.

When ready for the next stage, place the buttermilk, tabasco, lemon juice, garlic and Worcestershire Sauce into a large bowl or another marinade bag and then place each piece of chicken inside. Zip up then use your hands on the outside to ensure each piece is immersed in the buttermilk. Return to the fridge and leave for a couple of hours.

Chicken marinading in buttermilk

Pre-heat the oven to around 100 degrees – it’s just to keep the chicken warm once cooked if cooking in batches.

Now pour your oil into a fryer - or if like me you don't own one, a good quality wok or metal, heavy bottomed pan and place on a medium heat.

Meanwhile combine the flour coating ingredients, stir and set aside.

Test the oil is hot enough by dropping in a breadcrumb, when it sizzles, you know it's ready.

Now take each piece of chicken and coat in the flour, all over, tossing to ensure an even spread.

Now use tongs or a metal slotted spoon to lower the chicken into the hot oil - be careful. If using a wok or pan you'll need to do this in stages of 3-4 pieces at a time.

After 6-7 minutes, use the tongs or spoon to turn over the chicken pieces. Now cook for the same amount of time on the other side, or until cooked through and golden brown and very tempting looking on the outside.

Now place onto a wire rack in the oven and repeat the process until all the chicken is cooked, then place onto some kitchen towel on a plate to absorb any excess grease.

Buttermilk fried chicken

Serve with your choice of accompaniments. Enjoy!

Buttermilk fried chicken

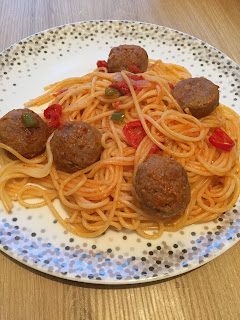
Lady and the Tramp style Meatballs with Spaghetti

I often make my own meatballs, it's a fun cooking activity with my daughter, but for a quick mid-week meal, I turn to shop bought. I have tried the various supermarket versions and the Tesco Finest range, are a favourite in our house – the beef ones.

This dinner can be on the table from start to finish in 20-25 minutes so is perfect during the working week when time is precious and despite a quick-made sauce the base, of onions, garlic and chilli pack it full of flavour - you could of course add some fresh herbs to further enhance too, such as torn basil leaves or thyme which would both work well here.

The chilli adds a lovely heat - but if your taste is for less heat, just add half or a quarter of the chilli.

Lady and the tramp style meatballs with spaghetti

This serves 3:

Here's how:
  • Pack of 12 meatballs
  • 1 white onion
  • 1 red chilli
  • 1 clove garlic
  • 1 tablespoon olive oil
  • 1/2 carton cherry tomatoes
  • 1 tbsp tomato puree
  • 1 green pepper
  • 50g spaghetti
  • Optional: cheese to grate on top (we use Parmigiana)

Firstly fill and boil the kettle for your pasta water - this speeds up the process and if it's good enough for Jamie, it's good enough for me.

Now add the olive oil to a large non-stick pan and place on a medium heat.

Finely dice the onion, mince the garlic and slice the red chilli and add to the pan to really flavour the oil, then once slightly softened add the meatballs.

In the meantime, dice the pepper and halve the tomatoes and once the meatballs have started to brown, add to the pan.

At the same time place your pasta on to cook, with a pinch of salt.

Add the tomato puree, a pinch of salt and black pepper to the pan of meatballs and stir to combine the sauce and reduce down the liquid from the tomatoes.

Meatballs in the sauce

Once the pasta is cooked, take a spoonful of the cooking water and add to the meatball mix then stir through to loosen up the sauce and help coat the pasta.

Now drain the spaghetti and add the pan and stir through well before serving. Enjoy!

Tuesday 13 September 2016

Cheat's Pavlova

This is a great quick and easy dessert that looks impressive as a centre-piece, for times when you might not have bundles of time to prepare one.

It's certainly a cheating version for meringue to shop buy it, but sometimes needs must and this is particularly good if you have unexpected guests for dinner as can be whipped up in next to no time.

If you do have time to prepare your own meringue, all credit to you, and I would suggest this fine recipe from BBC Good Food.

Cheat's Pavlova


Here's how:

  • X2 Meringue Rounds
  • Large tub of whipping cream
  • 1 tsp good vanilla (I use Nielson Massey)
  • 2 kiwis
  • 100g each: Strawberries, raspberries and blueberries Drizzle of Raspberry Coulis (I use a Morrison's one
Firstly place the two meringue rounds on separate plates.

In a bowl whisk the whipping cream with the vanilla until thick and spread over the cavity of each of the meringues.

Wash and then dry the berries. Halve the strawberries and set aside.

Peel the kiwi and cut into thin slices.

Now start in the centre and create your own pattern of fruit - I did a round of blueberries, followed by raspberries then alternated between a strawberry half and a kiwi slice.

Once you've arranged the fruit into a nice pattern, drizzle over a little coulis over each.

Now finally lift one and set it on top of the other (if you have one neater than the other, this is the time to showcase it on top). Enjoy!

Tomato and Vegetable Pasta Bake

This is another quick and easy dinner that's ideal for mid-week when time is precious.

You can use an array of vegetables according to what you have in stock but here I have used peppers and courgettes for a colourful combination.

It's a great family meal especially when served with a side salad or some steamed vegetables such as asparagus and acts as a great vegetarian dish for Meat Free Monday or any other day you feel like omitting meat.

Luckily Bridget is a great eater but if you have vegetable-dodgers in the family, you could very easily disguise the peppers by grating them into the sauce instead too.

I add a little smoky heat by a small amount of paprika, but you can adjust this according to your own or your family's taste buds.

The below serves four, with a side salad.

Tomato and Vegetable Pasta Bake

Here's how:
  • 1 white onion
  • 1 clove garlic
  • 1 yellow pepper
  • 1 red pepper
  • 1 courgette
  • 3 tomatoes or a carton of cherry tomatoes (could also use 1 tin)
  • 1 tsp paprika
  • 1 tbsp tomato puree
  • 250g penne
  • 50g mozzarella
  • Salt & pepper to taste
  • 1 tbsp olive oil

Firstly pre-heat the oven to 180 and add the olive oil to a non-stick sauce pan and place on a low heat.

Now finely dice the onion and mince the garlic and add to the pan as the base of the sauce.

Dice the courgette, peppers and tomatoes and once the onion and garlic have softened, add to the pan.


Add a pinch of salt, black pepper, the tomato puree and paprika and cook for a further 15 minutes until reduced down to a thin sauce.

Meanwhile cook your pasta accordingly, (I always add a pinch of salt) and before draining take a tablespoon of the cooking water and add to the sauce to loosen and help coat the pasta.

Now drain and add the pasta to the sauce pot and stir well to ensure each pasta piece is covered.

Now transfer the pasta to an oven proof dish and tear over the mozzarella.

Now place in the oven to bake for 30 minutes or until the cheese is melted and you have a golden brown topping. Enjoy!

Pregnancy Food Diet: Week 17

This past week has been another busy one with a few shortcuts happily taken on the food front plus a meal or two enjoyed out – counting down now to our 20-week scan.

Breakfasts:


Again this has remained a mixture of Nutriblasts or homemade smoothies such as this Banana & Mango combination , plus the Pret Five Berry Bowl of yoghurt, berries and granola during the week. At the weekend I made chocolate pancakes for me, Glen and Bridget on Saturday and served with yoghurt and berries and Sunday we had a combination of what was left in the fridge before the weekly shop: toast, fried tomatoes, blanched asparagus and a rasher of crispy bacon. Surprisingly delicious together.

Main meals:

On Wednesay I enjoyed a delicious lunch of Middle Eastern sharing plates with Chloe Pierre LDN at Nopi

Thursday we enjoyed quick-made Chicken Fajitas made with Old El Paso Smoky BBQ Fajita Mix.

On Friday, after a busy working week, I turned to convenience and cooked some Morrison's breaded cod with McCain's Oven Homefries and a big portion of peas.

Saturday I had to pop into central London with my daughter, brother and his partner and we enjoyed a lovely late Dim Sum meal at Imperial China on Lisle Street.

Prawn and chive dumplings

Prawn cheung fun 

Sunday's are always a good day for cooking and eating together, and we fancied something different. I made this variation of a Chicken and Apricot Tagine and it was gorgeous.

Chicken and apricot tagine

Monday, my day off from work, I spent a bit of time batch-cooking so have some easy-win meals, or at least the basis of meals to hand in the freezer. For our Monday meal I slow cooked some braising steak with onions and mushrooms in ale and beef stock and made this wonderful Steak and Ale Pie with mash and vegetables. Just lovely!

Steak and ale pie

Tuesday night we had a team work night out which involved some crazy golf in trendy Brick Lane at Junkyard Golf. By the time we'd finished we had missed all dinner queues but knowing I have to eat, I made a quick couple of slices of cheese on toast before bedtime, needs must!

Thursday 8 September 2016

Messy Toddler Play: Indoor Painting

Anything relating to arts and crafts will be a sure-fire winning activity for toddlers and small children.

Messy play with paints

The sensory act of painting with brushes and encouraging your little one to get their hands wet and dirty and create hand prints with paint will keep them entertained for a good hour or more, especially when bolstered with plenty of encouragement - children thrive off of being told how well they are doing. In fact Bridget loves a little round of applause when she finishes a painting.

Hand painting

It's also a great way to help teach them their colours in a fun and interactive way.

Painting outdoors in the garden is a good way of getting fresh air and keeping the painting mess to a minimum.

Some people obviously don't have a garden and painting is also a great rainy day activity too, so painting indoors must be entertained at times and I recently discovered a great parenting hack to keep the mess to a minimum.

People have long used newspaper on the floors or on tables where painting is occurring to reduce the mess, and I thought how about cling film? Bridget has a lovely easy-wipe high chair, which actually we've very recently adjusted to a stool for her to sit right at the table with us without her little tray (at nearly two she is growing up too fast). I also use the Crayola Washable Paints which do come off in our experience, but sometimes the paint might dry without you noticing; so I wrapped Bridget's tray and the seated area in cling film and then could allow her to get as messy as she wanted without constraint - she loved it.

Learning colours with paints
Happy painting face

I also encourage paint in just knickers when warm enough as a quick bath afterwards is no trouble and this prevents clothing getting paint sploshes on, but otherwise old clothing or a little painting overalll like you can get in Early Learning Centre and the likes are worth investing in.

Bridget's birthday is fast approaching and we've bought her a little art desk complete with easel and supplies so we'll be encouraging lots more messy play this winter which will be helpful when I'm in the midst of my third trimester or when baby number two has made his/her arrival. Happy painting all :-)

Peach Upside Down Cake

This is a really lovely moist cake that makes the most of any leftover peaches you may have in the house. I took it from BBC Good Food - a truly wonderful cooking resource, and the recipe called for tinned peach halves but I had a punnet of fresh so use whichever you prefer.

I baked this with my daughter Bridget who is nearly two - she loves making cakes or helping with anything she can in the kitchen and I love to encourage her. She's already a great eater and children are much more willing to try foods they've had a hand in preparing. Obviously if making with children ensure you do the peeling with sharp knife and keep them away from the hot oven.

It's gorgeous when slightly cooled from the oven and works as a cut and keep cake for 2-3 days (I doubt it would last much longer) but also works as a dessert with ice cream or custard too.


Peach Upside Down Cake

Here's how:

  • 250g salted butter, soft
  • 280g self raising flour
  • 250g caster sugar
  • 1/2 tsp baking powder
  • 4 eggs
  • 150ml natural yoghurt
  • 1 tsp good vanilla extract (I use Nielsen Massey)

For the top:
  • 2tbsp caster sugar
  • 1 tbsp plain flour
  • 6 fresh peaches or 2 tins of peach halves
  • 12 raspberries

Pre-heat the oven to 180 and grease and line a baking tin - I used a 22cm round one.

Firstly peel the peaches and halve, removing the stone from each. Try not to squeeze out too much juice as you are doing so as you want that to help keep the cake nice and moist.

Now mix the topping flour (1 tbsp) and caster sugar (2 tbsp) and scatter over the base of the baking tin.
Place a raspberry into the cavity of each peach half and then place, cut-side down, onto the base until the tin is covered.

Now in a mixing bowl combine the flour, sugar, butter, yoghurt, vanilla, baking powder and eggs until a smooth cake batter is achieved.

Now pour evenly over the peaches and try to get the cake looking as even as possible. Then place into the oven on the middle shelf and leave to bake for 35-40 minutes, or until the cake has risen and has a golden brown topping. Test with a skewer and see if it comes out dry - if so it's cooked through. If not, return to the oven for five to ten minutes.

Leave to cool in the tin for 20 minutes then use a knife round the edges to loosen before turning out.


Try to enjoy a slice while warm - it's delicious. Enjoy!

Wednesday 7 September 2016

Steak and Ale Pot Pie

There is nothing more warming or comforting than a meal of homemade pie served with smooth mashed potato and vegetables - it just cannot be beaten in the comfort food stakes.

This one is a favourite and I vary it between different ales, sometimes a stout or a Guinness, it always yields fantastic flavour and is a real family favourite.

I only add a puff pastry lid so it isn’t quite as naughty as it could be, and I am unashamed to admit I use shop-bought puff pastry (this time from Lidl) that is ready rolled as a slight shortcut. The meat takes a good three hours of slow braising in the broth before putting into the pie dish though, so I still feel rather virtuous.

Steak and Ale Pot Pie


Here's how:
  • 500ml ale (I used Shepherd's Neame Bishop's Finger)
  • 500g braising steak
  • 100g mushrooms
  • 1 onion
  • 500ml beef stock or gravy
  • 1 tsp Salt
  • 1 tsp white Pepper
  • 1/2 tsp dried thyme
  • 3 tbsp plain flour
  • 1 tbsp rapeseed oil
  • 1 pack ready rolled puff pastry
  • 1 egg

Firstly add the rapeseed oil (olive or vegetable oil is fine too) into a non-stick pan on a medium heat and place the oven onto 180.

Now cut the beef with a sharp knife, into generous bite sized pieces.

In a bowl place the plain flour and season, generously then give a quick stir. Now place the meat into the flour and toss to coat it in the seasoned flour all over. This will help to not only flavour the meat, but to thicken the cooking liquor into a thick gravy.

Add the meat to the pan and sear on all sides to gently brown, then remove the meat and add to a casserole dish.


Now slice a large white onion and add to the dish. Wash and slice the mushrooms and add to the dish and give a good stir.

Pour over the ale you are using and the beef stock, place the lid on top and put the dish into the oven for 3 hours of cooking.

After the first half hour turn the oven down to 160 and try to stir the dish every half hour or so.

Remove from the oven once cooked and test the meat, it should be tender and soft enough to break with ease when pushing a fork through. If the meat is still a little tough, return to the oven for 30 minutes.

Now leave to stand for 30 minutes or more as this will help the sauce to thicken further. Place the meat and juices into a pie dish.


Now place the pastry lid over the top so it hangs over the side and use your thumb to press down all round the edges to seal it. As this is a pot pie it needn't be super neat and certainly isn't at my house.

You can decorate the top with any adornment or leave it plain, as my daughter loves to help me cook we use cookie cutters to make different shapes each time.

Now beat an egg and use a pastry brush to coat the pastry and help it have a lovely shine and colour when cooked.


Finally use a sharp knife to make 2-3 incisions straight into the pastry, this is to allow the steam to rise out and avoid soggy pastry.

Place into the oven for 30-35 minutes or until golden brown and serve with your choice of accompaniments. Enjoy!

Tuesday 6 September 2016

Pregnancy Food Diet: Week 16

This week the nausea really has lifted which is a huge relief all round, it makes cooking and actually eating so much easier.

As I don't like to take an iron supplement as find this just plays havoc with my insides and clogs me up, I've tried to up my iron intake this week with lots of leafy green veg. Some batch cooking over the previous weekend has been a life saver for a couple of mid-week nights where the tiredness has really kicked in too - thoroughly recommend this.

There have been a few more treats than usual this week too - I blame the bank holiday weekend :-)

Breakfasts:

This has continued to be a combination of smoothies with either yoghurt (this week I've been having the Liberte with blueberry) or granary toast with Marmite. As I've been hit by a bit of an energy-slump, particularly after a day at work followed by an event in the evening, I've been adding either a teaspoon of raw cacao or coffee to my usual Nutriblast for that little early morning caffeine energy boost. A favourite this week has been a banana, a handful strawberries and walnuts, a teaspoon of raw cacao topped up with water - gorgeous.

Mid-Week Meals:

1. A treat of a meal out at The Real Greek with my friend Larni saw ne tucking into halloumi, tarramasalata, pork belly and flat breads - divine.

Halloumi at The Real Greek

2. Pesto Topped Salmon with Spaghetti, rocket and a handful of cherry tomatoes was a winner for the three of us this week.

3. At the work event I had a lovely pea and lemon risotto at The Happenstance with a few small canapes and a delicious cupcake from Doilies 4. A divine looking cheese board at the work event really charged my blue cheese craving - one of the off-limits items during pregnancy, unless thoroughly cooked. So I made this lovely Creamy Mushroom and Blue Cheese Risotto and served with plenty of rocket.

Creamy Mushroom and Blue Cheese Risotto

5. Friday night was a treat of homemade lasagne from the freezer that I'd batch cooked at the weekend and served with a salad - again lots of leafy rocket.

Weekend Meals:

Saturday Glen, Bridget and I ventured to Southend for the day, and had a lovely seaside fish and chips along the seafront - delicious. Sunday we enjoyed a roast pork dinner with lots of crispy roast potatoes and vegetables at my parents’ house cooked by my Mum, and on bank holiday Monday I had a couple of friends over and made the Bruschetta for us to share followed by Seabass en Pappillote, dauphinois potatoes, asparagus and spinach. Missing our usual wine but I'm obviously abstaining, Jem was driving and Steph was suffering from her Sunday night intake!

Roast pork at the Cheungs

Seabass en pappillote
A great week for food - less treats next week.

Chicken and Apricot Tagine

I have been cooking tagines of different variations for a few years now and each time yields a different result, but the version below has been our favourite to date. It's a rich, aromatic Middle Eastern flavour with a slight kick of heat, but mild enough for our nearly two-year-old, Bridget to enjoy too, so a great Baby Bites, family meal idea.

The great thing with a tagine is that you can adapt it according to what you have to hand, but I almost insist you include the dried apricots here, they absorb the moisture and puff up into such a delicious little morsel and with the drizzle of honey bring a lovely sweetness to the dish which helps to balance the flavours.

I serve with jewelled couscous (made with peppers, spring onions, pomegranate seeds and coriander) but you could serve with rice or with warm, fresh bread if you prefer.

Chicken and apricot tagine

Here's how:
  • 1 onion
  • 2 cloves garlic
  • Big piece ginger
  • 8 chicken thighs
  • 1 tbsp ras el hanout
  • 1 cinnamon stick
  • 1 tsp dried chilli flakes
  • 1 tsp dried coriander
  • 2 carrots
  • 100g dried apricots
  • 2 tomatoes
  • 500ml chicken stock
  • 1.5 tbsp honey
  • 1 tsp white pepper
  • 1 tbsp olive oil
  • Garnish:
  • Handful coriander leaves
  • Handful flaked almonds

Firstly add the olive oil to a non-stick pan and place on a low heat. Pre-heat the oven to 180 and rearrange the shelves so your tagine fits in before the oven gets hot. If you don't own an actual tagine, use a casserole dish with a lid.

Now take the chicken thighs and scatter over half the ras el hanout on the skin side, then add to the pan, skin-side-down and sear for four or five minutes. Pop the rest of the ras el hanout over the other side of the thighs and when the skin side is nicely browned, turn over and cook for the same amount of time or until no pink exterior remains, remove from the pan and add to the tagine base.

Now peel and slice an onion and mince the garlic and add to the tagine. Peel the ginger and either slice or grate into the tagine.

Take two tomatoes and dice then peel the carrots and chop them into batons and add to the dish.

Now add the remaining spices and seasonings, the apricots, honey and chicken stock and give a good stir. Replace the lid and cook for 40 minutes.

In the meantime prepare your accompaniments ready to dish up. Serve with a flourish of fresh coriander leaves and once on the plate scatter with flaked almonds. Delicious!

Tip: if serving to toddlers or small children as I do, I go for a 'de-constructed' version when dishing up. I de-skin the chicken and cut into bite-sized chunks, not because my daughter is unable, but the tagine keeps the heat incredibly high and this is a good way of cooling the meat a little so she doesn't burn her little mouth.

More tagine recipes from me:

Friday 2 September 2016

Pregnancy Food Diet: Week 15

When searching the internet for 'pregnancy diet' the findings aren't the most inspiring. Several websites offer advice in terms of what you should be having generally, such as two portions of fish a week, with one portion being an oily fish (such as salmon, mackerel, sardines), and lots of dark green vegetables and lean meats and pulses for the iron levels, there seems to be a distinct lack of recipe or meal ideas specifically for pregnancy.

So I've decided to offer a weekly pregnancy food diary from here on in, with meal ideas that are suitable for the whole family and that hopefully offer a varied, balanced diet with some naughty treats in there too for good measure.

I try to cook from scratch most days, but am not averse to a meal out or a takeaway so this is my honest account of pregnancy food. I hope it helps to inspire a few ideas for other pregnant ladies at a loss for what to cook for their families during this busy time when tiredness can be a key factor in turning to convenience.

Breakfasts - I've still been feeling fairly queasy this week, so breakfast has been a combination of different things. I've had Greek natural yoghurt with honey, blueberries and flaked almonds a couple of days, but most days it's been wholegrain toast topped with Marmite and a Nutriblast with a piece of fresh ginger to try and help keep the nausea at bay. I try to mix up the ingredients for my daily smoothie as it gets boring otherwise, and include a mixture of both vegetables and fruit. These are a great way of starting the day with a good fix of fibre and hitting half of your 'five a day' target. Here are three different variations I've enjoyed this week:

  • Half Kale, small piece of ginger, handful each of blueberries, blackberries and strawberries and half a nectarine topped up with water
  • Handful of Strawberries, a nectarine, handful of walnuts and coconut milk
  • Half an avocado, small piece of ginger, handful kale, handful pumpkin seeds and handful blackberries Tuesday 16th August:


Lunches:

As I've been at work most of the week, this has been a variety of grab-and-go options, such as soups, salads and sandwiches from the likes of Pret, Marks & Spencer and Itsu

For a weekend brunch, I had my usual smoothie but with a slice of toast topped with mashed avocado, a handful of dried chilli flakes and a pinch of coarse sea salt - delicious.

Avocado on toast


Evening meals:

Mid-week I generally get home between 6:45-7:15 most evenings so Bridget will have already eaten, but Glen and I always sit down to a meal together, which I'll cook while he reads a bedtime story and does bath-time. I try and keep the meals under 30 minutes for both preparation and cooking time so that we eat by 8pm the latest every evening, where possible and here are some of the quick and easy meals we had during the week.
  • Cajun-spiced pan-fried salmon (I use a Schwarz rub) with a selection of green vegetables and a 'jewelled couscous', which I whipped up whilst the salmon was frying. I top with the appropriate amount of boiled water and top with a plate for this and then chop up all my seasonings - in this case, cucumber, orange pepper, spring onions and fresh mint leaves, plus the seeds of an entire pomegranate for that 'jewelled' effect. Delicious.
Cajun spiced salmon with jewelled couscous and vegetables
  • Quick chicken curry using Marks & Spencer Jalfrezi Paste, onions, garlic, ginger and fresh chilli with green pepper and mushrooms, plus chicken thighs - frying all off which the curry paste then topping with tinned tomatoes and serving with microwave rice.
  • Inspired by my brother's Instagram posts of Mykonos followed by Athens, I was craving Greek food and made this Greek Chicken One Pot.
  • Jacket potato with cheese and coleslaw plus a generous salad on the night that Glen had football training as I didn't have much energy.
  • A quick bolognese with lean steak mince and topped up with lentils served with spaghetti (onions and garlic fried gently in olive oil, the mince and finely diced carrot added with a pinch of salt and pepper. Once browned a teaspoon of cinnamon was added then a tin of tomatoes and a tablespoon of tomato puree plus a teaspoon of red wine vinegar. Cook for 20 minutes and add a teaspoon of dried oregano for the last five minutes).

Weekend Meals:

On the Saturday I prepared 'fish, mash and liquor' or to those who aren't so familiar with this meal, cod poached in a mixture of whole milk and water served with creamy mashed potato and peas and a parsley sauce made directly from the fish cooking liquor. Topped with lots of chilli vinegar and white pepper - this was fantastic and helped me hit my 'two portions of fish' target for the week.

Fish, mash and liquor

The Sunday was my youngest brother, Dean's birthday so we had a treat - dim sum feast at Dockland's Yi Ban.

Coffee and Walnut Tray Bake with Vanilla Latte Icing

The return each year of The Great British Bake Off inspires me, plus half the nation to don our aprons and bake, and this is my offering this week.

Despite it being biscuit week, I didn't have all the ingredients (or the time) to attempt viennesse whirls on Wednesday post-GBBO, so I turned to ingredients I always have on stand by and made this Coffee and Walnut Tray Bake - a recipe from Mary Berry's Baking Bible and just added the simple flourish of a teaspoon and a half of good quality vanilla (Nielsen Massey) to make the Vanilla Latte icing. I also didn't have coffee essence so used my trusty Nescafe Azera instead and it worked just as well.

Coffee and Walnut Tray Bake with Vanilla Latte Icing

Here's how:
  • 225g softened butter (I use salted)
  • 225g light muscovado sugar
  • 275g self raising flour
  • 2 tsp baking powder
  • 4 large eggs
  • 2 tbsp neat made up coffee (I use Nescafe Azera) or can use 2 tsp coffee essence
  • 2 tbsp milk
  • 75-100g roughly chopped walnuts
Icing:
  • 75g softened butter
  • 225g icing sugar
  • 1.5 tsp good quality vanilla essence (I use Nielson Massey)
  • 1 tbsp coffee (as above)
  • 1 tbsp milk

To decorate:
  • A few walnut pieces

Firstly pre-heat the oven to 180 and grease and line your preferred baking tin or dish with greaseproof paper.

In a large bowl mix all of the dry ingredients and mix, then everything else and mix well with a wooden spoon until you have a lovely coffee coloured, fully combined cake batter.

Pour into the tin and move around so it's as even as you can get it.

Bake for 30-35 minutes, or until golden brown and well risen. Test it's done by pressing down gently with a fingertip, it should bounce back if cooked through and be light and springy. You can also use a skewer to pierce the cake in the centre and make sure it comes out dry and not still wet.

Leave in the tin for ten minutes to cool slightly, then turn out onto a cooling tray and leave for a further 20-30 minutes to avoid curdling the icing.

When ready to make the icing, place the icing sugar, butter, vanilla essence and coffee into a bowl and mix with a wooden spoon until combined. Add the milk a drop at a time until you are happy with the icing consistency, it should have a little texture but be easy enough to spread over the cake.

Place the tray bake on a board or large plate, and gently peel down the sides of the greaseproof paper so the icing has room to run down the edges of the cake a bit.

Now use a palette knife, or the back of a metal spoon, to spread over the icing until it is evenly distributed. Leave to stand for five minutes.

Place a line of four walnuts down the centre, lengthways, of the tray bake which will help you portion up. Press down very gently when placing them on.

Now use a sharp knife to cut into similar sized portions - I find cutting straight through the middle then halving works well. Once portioned up, place a walnut piece into the centre of each piece of cake and serve immediately with a cup of tea. Enjoy!

Creamy Mushroom and Danish Blue Cheese Risotto

I made this out of a severe blue cheese pregnancy craving - as I'm only allowed it when cooked through and it was a definite winner. Rich, creamy and unctuous with that perfect blue cheese tang - it's sure to become a regular and is a great Meat Free Monday option if you stick to vegetable stock - of which we have been neglecting grossly in recent months.

This makes enough for three portions.

Creamy Mushroom and Danish Blue Cheese Risotto

Here's how:
  • 250g arborio rice
  • Handful spring onions
  • 1 clove garlic
  • 1 tablespoon extra virgin olive oil
  • Carton of chestnut or field mushrooms, thoroughly washed 100g Danish Blue (I used the Lidl Milbona) 
  • Pinch salt 
  • Pinch black pepper 
  • Pinch dried thyme
  • 1 litre chicken or vegetable stock
  • 1 tablespoon crème fraiche

Firstly add a tablespoon of the olive oil to a non-stick pan and place on a medium heat.

In the meantime finely dice the onions and mince the garlic and add to the pan to sauté gently.


Wash and dry the mushrooms, and chop into small pieces, set aside for the moment.

Once the onion and garlic have softened add the arborio rice to the pan and quickly move around with a wooden spoon to ensure all the rice is in touch with the base and the oil. Allow to cook for five minutes, stirring every couple of minutes, and not allowing to burn.


Now add the mushrooms and allow to cook for a minute before adding a ladleful of the stock plus a pinch of salt and pepper.


Stir and allow the rice and mushrooms to absorb the stock fully, and keep stirring to prevent any sticking at the bottom. Continue by adding a ladleful more at a time and the same process of stirring etc. until the rice has puffed right up and absorbed most of the stock. Taste the rice to check if it has the consistency you prefer and once happy, allow all the stock to be absorbed then add the crème fraiche to thicken the risotto and add a delicious creaminess to the texture and flavour.


Once the cream has been absorbed crumble in the Danish Blue cheese, and allow to fully melt, continuing to stir all the while. Finish with seasoning to taste and dish up on a bed of rocket, spinach leaves or watercress for a delicious mid-week meal.


Thursday 1 September 2016

Bruschetta Two Ways

On Monday I had a couple of friends, Stephanie and Jemma over for a meal and whipped up a couple of fail-safe bruschetta choices as part of our antipasti - or starter.

Bruschetta is a beautiful, beautiful thing and yet so often I've had bland versions and been disappointed. When the three of us, and our jet-setting friend Jade, were in Rome earlier in the year, we attended a pasta making class and I asked the chefs about the perfect bruschetta (theirs was insanely good). As ever in Italian cookery, the key is using the best possible ingredients - quality is mandatory. Also they told us to never, ever put tomatoes into the fridge as this takes away from the flavour - a rule I've stuck to since, and can genuinely taste the difference.

Here are two ways to top bruschetta Italian style - the second is a creation of my own made simply to use up the last of my homemade Walnut and Basil Pesto. The below makes about 6-8 slices for each topping and they are suitable for all the family.

Bruschetta - tomato and Pesto and Mascarpone

Tomato Bruschetta

  • 1 ciabatta (or other crusty fresh bread) Couple of large tomatoes (room temperature)
  • 1 clove garlic
  • 2 tbsp Extra Virgin Olive Oil - Italian preferably
  • 1 tsp balsamic vinegar
  • Tsp sea salt
  • Tsp black pepper
  • Optional: few basil leaves

Firstly slice up the ciabatta and set aside. Peel a garlic clove and cut in half, now rub all over the bread slices using the 'wet' part of the garlic to impart some great flavour. Lay flat on a plate or a board and season with sea salt and black pepper, then turn over and do the same. Set aside for the minute.

Cut the tomatoes into small chunks, removing most of the seeds and place into a small bowl. Top with the olive oil and balsamic and stir. Leave to stand for a good half an hour.

Now lightly toast the slices of ciabatta under the grill on both sides. Remove from the grill and top with the tomatoes.

You can of course add a final flourish of basil to add another classic Italian taste, but these are great as they are.

Pesto & Mascarpone Bruschetta with Mozzarella
  • 2 tbsp Walnut Pesto (homemade pesto is always better but jarred is fine if that's all you have)
  • 1 tub mascarpone cheese
  • Half a ball of mozzarella
  • Grating of fresh nutmeg
  • Black pepper

Repeat step one from the Tomato Bruschetta to get the slices ready for the topping.

Simply combine the pesto and mascarpone and mix really well with a wooden spoon until completely combined and a minty green hue. Add a generous pinch of black pepper and mix some more.

Spread over a generous spoonful onto each, and then grate over a little nutmeg onto each.

Tear the mozzarella and add a small piece to the top of each slice.

Tip: any leftover topping makes a fantastic alternative dip for blanched asparagus spears, sliced peppers or carrot batons.

Nopi

Yesterday I visited Nopi on Warwick Street, London, Ottelenghi's more upmarket outpost and a take on his Middle Eastern sharing plates for which he is so synonymous.

I visited with the lovely Chloe Pierre LDN and we were seated downstairs in the less formal communal dining area - where two large canteen-style tables invite diners to sit among each other. We were in with the supplies in open plan shelving - from Cretan olive oil, coriander seeds and large jars of vine leaves, Chloe mentioned it was like being in the store cupboard but I liked the quirkiness and open-ness of it all. 

Downstairs at Nopi


We also had easy viewing of the open plan kitchen, which for me, is always a winner. The atmosphere was light, chatty and relaxed, perfect for a lunch time meeting and diners were a complete mix of business lunchers and friends catching up.

Open plan kitchen at Nopi

The waitress we had was knowledgeable and informative about dishes on the menu, giving us clues to her favourites and the ones that have stood the test of time.

We opted for a selection of six sharing plates between us, and the first to arrive was a crushed beetroot plate with goat's cheese and toasted hazelnuts. It had the vivid trademark purple beetroot colour and looked incredibly vibrant and beautiful to look at, happily the flavours matched and even excelled the appearance, it was a delicious dish. The earthiness of the beetroot was there but with an underlying sweetness that was perfectly offset by the tangy goat's cheese and the toasted hazelnuts. A really well executed dish.

Crushed beetroot at Nopi

With the beetroot arrived the burrata - one of my absolute favourite things to eat, it was well served with a portion of coriander seeds, roasted peach a flourish of micro herbs and a plum reduction, and another good dish. It I had a minor criticism, it would be that the burrata could be slightly creamier - I've purchased some wonderful burrata myself recently from a stall at Borough Market and this wasn't up to the same unctuous, creamy quality.

Burrata at Nopi

We had the twice cooked baby chicken, with lemon myrtle salt and a simple chilli sauce - one of the best dishes for me, the chicken was crispy and charred with that barbecue flavour on the outside but soft and moist inside and perfectly seasoned. Delicious.

Twice cooked baby chicken at Nopi

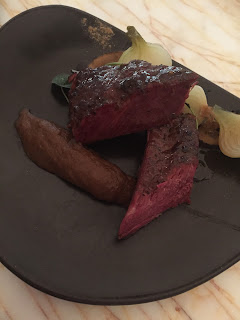
The beef short rib was a revelation; I was expecting a slow-cooked concoction, maybe even stew-like, as opposed to the perfectly pink arrival. It was tender, seasoned well and utterly gorgeous. I've been avoiding 'rare' meat during pregnancy but this was a temptation too far and I couldn't resist - it was totally worth it too! The accompaniments, pickled styled shallots with a shitake mushroom all complemented the dish perfectly.

Beef short rib at Nopi
We ordered the truffled polenta chips, and whilst they looked great, I wasn't keen on the polenta - I'm unsure on the texture and the taste and we both agreed it was the one dish we could have done without.

Truffled polenta chips at Nopi

Another side dish we ordered was one of the stars of the show for me - heritage tomatoes dressed in sumac, red onion and basil. An almost pickled taste overall, and stunning brightly hued tomatoes that just tasted divine. A flavourful reminder of just how great, supposed 'side dishes' can be, and why Ottolenghi's style is so widely emulated and revered. Fantastic.

Heritage tomatoes at Nopi
We both had a mocktail and the entire meal at Nopi came in at £82 including service. As is often the case with anywhere proffering 'small plates' they may be small but the price soon adds up. Probably a fair price given the name and the location in the heart of the West End. I'll definitely return and next time will be trying the fishy choices of rainbow trout and sea bass as well as the roasted butternut squash.

If you like Middle Eastern food and are in the area, definitely give Nopi a try – but be warned, booking is wise as they were packed during the lunchtime service yesterday.