Showing posts with label Cupcakes. Show all posts

Tuesday, 18 October 2016

Children's Party Food: Vegetable Train

Pig Train Driver and Vegetable Train
For Bridget's recent second birthday party, I was entertaining a number of toddlers and wanted to prepare some food that was fun as well as healthy and this veggie train ticked the boxes. Having scoured Pinterest for ideas, I saw trains made out of hollowed cucumbers but thought peppers would hold more and be easier for my clumsy hands.

With a little preparation, some fiddling and a fair few cocktail sticks - we had this lovely train that had a few of the kids running back into the dining room to take another look and yelling 'choo choo', I have a feeling it'll be making a regular appearance at children's parties from now on.

As it was a Peppa Pig theme party too, I even managed to secure an M&S Percy Pig on the front to look like the driver - such a fun idea and easy to replicate at home.

Vegetable Train
Here's how:

  • 1 large cucumber
  • 4 different coloured peppers
  • 1 carrot
  • 2 celery sticks
  • 1 Percy Pig (optional)
  • Handful cocktail sticks to assemble
  • 1 wooden or plastic board or platter

Firstly prepare the cucumber - you need three sections of this as so, some sticks to place in one of the pepper 'carriages', ten sliced rounds or circles to act as wheels (you could of course use half a cherry tomato each or some sliced radishes) and then the front of your train which is a little more fiddly.

You need about 6-7cm length of cucumber including the pointy end, leave 2 cm untouched and neatly slice halfway across, long-ways off and set aside the leftover piece which will act as the train 'roof'. Now you need a further length of cucumber of about 3-4cm to act as the train drivers section - it should be a little square, and you can cut small little square 'windows in the sides if you so wish. Now use a cocktail stick first to pierce the corner of the roof, then into the corner of the train drivers bit and finally all the way through to the base, to secure. Do the same the other side. Now place a round of cucumber - or a wheel at the front on either side of the front of the train and again use 1 cocktail stick to secure - use scissors to trim down if it's too long. Set aside. If you are using a Percy Pig sweet as a 'driver' also secure him with the end of a cocktail stick.

Now you need to lay each pepper on it's side, and cut out a rectangular section, that you will then slice as the vegetable fingers or crudités and set aside. Now using the knife, cut out all the seeds inside each pepper to make a hollow 'carriage'. Trim a couple of cocktail sticks into thirds, and use to secure a cucumber round 'wheel' onto either side of each pepper carriage.

Now place the front of the train and the pepper carriages onto the board in the order you wish them to appear.

Cut the two celery sticks into equal (ish) sized pieces and lay them as 'tracks' either side of the train.

Now fill the pepper carriages with the leftover pepper cut into slices, some carrot and cucumber batons and your train is ready to go.

Serve alongside dips such as hummous, tzatziki, guacamole, tarama and salsa. Enjoy!

Some more children’s party food ideas can be found below:

Caterpillar Sandwiches

Smoked Salmon Blinis

Spiced Chicken Goujons

And for real piggy inspiration try these Peppa Pig Rice Paper Topped Cupcakes or Pig Face Cupcakes.

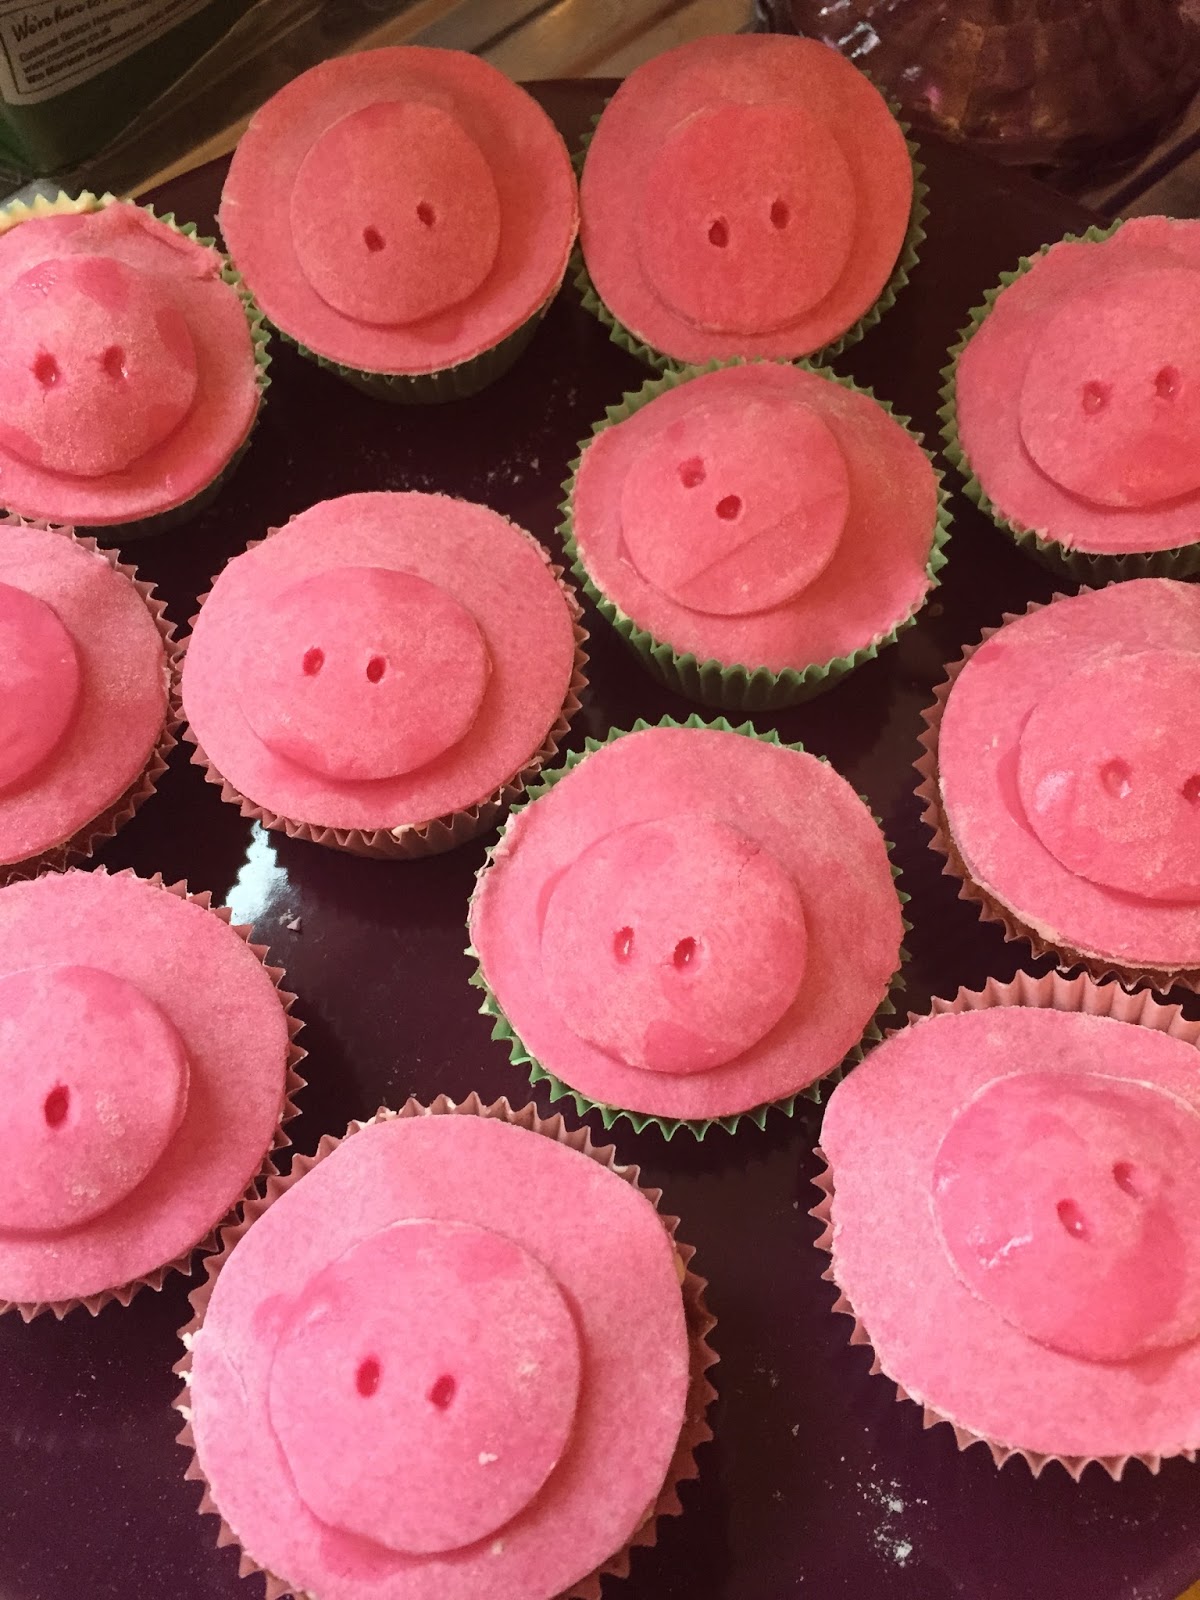
Children's Party Food: Pig Face Cupcakes

As we recently celebrated Bridget's second birthday and she is somewhat obsessed with Peppa Pig, I decided to make her some Piggy based cakes - with some inspiration stolen from Pinterest - where there are some pretty elaborate and impressive versions!

I have to say, whilst I'd say I'm a competent cook and baker - I'm lacking somewhat in the artistic presentation stakes - not through want of trying, I just express my creativity differently. So I went for something simple that still looked piggy and relied on cookie cutters and a tiny bit of shaping of fondant - if I can do it, so too can most children! And whilst this is great party food it could also work as a fun baking activity with your children - perfect for a rainy day activity or cold and wintery afternoon distractions.

I used the classic cupcake or fairy cake recipe that I've used time and time again, from Mary Berry but doubled up and used half the mixture for making the Peppa Pig Rice Paper Cupcakes.

For the whites of the eyes, if you have a steady hand you could pipe on some buttercream, but I found using fondant icing slightly easier for my not-so-steady hands.

Once the cupcakes were cooled enough to take on the fondant here is how I made them into little piggies.

Pig Face Cupcakes

Here's how:

1 batch Mary Berry basic cupcakes slightly cooled (Use the all-in-one method to combine: 175g each; slightly softened butter, self-raising flour, caster sugar, 3 large eggs, 1 tbsp vanilla extract, ½ tsp baking powder)
1 pack pink fondant icing (I used Renshaw's)
1 pack white fondant icing (Renshaw's)
1 black icing pen (could also use those sugar balls instead)
1 tablespoon icing sugar
Drop cold water

Firstly find a round cookie cutter that will be almost big enough to cover the entire top of each cake and set aside. Now find a smaller round cookie cutter for the nose and set this aside also.

Now make sure you use a completely clean and dry worktop space to very lightly flour, then flour a rolling pin and roll out the pink fondant icing until it is about 1/2cm thick.
Cut out the number of toppings you require for your cupcakes (I did 18).Combine the icing sugar and water in a small cup and mix well. Use a pastry brush to top each cake with a little icing then secure a topping on each cake.

Pig face cupcakes

Now make the noses using the smaller cutter. Using a sharp skewer make two nose holes in each, you can go all the way through.

Pig face cupcakes

Now place a little icing onto the back of each nose then gently tap it down into the centre of each pig's face.

Now using a tiny ball of pink icing for each pig, roll out a little pair of ears for each and set aside for the minute.

Now get the white fondant icing and cut off a quarter of it - that will be sufficient. Roll this out and then create 18 pairs of small, white balls for eyes, then flatten them onto each pig's face, securing with a tiny bit of icing and hold down. You won’t require all of the icing – secure the rest in a sealable bag and this will keep for a while in the cupboard.

Now use the same method to secure the ears on top of each pig's face.

Finally, use the black icing pen to drop a tiny dot or 'pupil' onto each eye.

If kept in a sealed container these can keep for a couple of days - perfect if you've got a lot of party preparation to get on with. Enjoy!

The piggy corner

Children's Party Food: Peppa Pig Rice Paper Cupcakes

Bridget was two a couple of weeks ago and so we threw a little party to celebrate. Her current phase is Peppa Pig and has been since Christmas time so naturally we tried to incorporate this into the party food and these cupcakes worked well and went down well with both the children and the adults. Who doesn't love a cupcake?

These are an incredibly simple recipe that is great for parties or just baking with your children. The basis for the cupcakes is the 'all in' method from baking legend Mary Berry and the topping is a simple buttercream, some 100's and 1000's and in our case, some Peppa Pig rice paper cake toppers - but if for a party and your little one has a preference you can source all number of rice paper toppers online - Amazon and Ebay have an amazing selection!

You could omit from the 100's and 100's and just use rice paper toppers but I liked the way it made them all the more colourful and fun for a party - and as an occasional treat at birthdays, I don't think there's anything wrong with allowing your child a sugary treat.

Peppa Pig Rice Paper Cupcakes

Here's how:
  • 1-2 batch Mary Berry's basic cupcake recipe (Use the all-in-one method to combine: 175g each: slightly softened butter, self-raising flour, caster sugar, 3 large eggs, 1 tsp vanilla extract, ½ tsp baking powder)
  • For the icing:
  • 150g slightly softened butter
  • 280g Icing sugar
  • 1/2 tsp vanilla
  • 1 tbsp milk
  • 1 tub sugar strands
  • 1 pack rice paper cake toppers – Peppa Pig if you so wish

Once you've prepared the cupcakes and allowed to cool sufficiently, place the butter and icing sugar with the vanilla in a small bowl. Use a wooden spoon to mix well until thoroughly combined.

If the mixture is a little stiff, add a tiny drop of milk to loosen a little then mix again.

Now using a knife or the back of a spoon scoop up a little buttercream for each cupcake and spread over the top to cover well.

Once all are coated, scatter over the sugar strands and use the back of a clean spoon or a clean finger to just very gently pat them in, to ensure they don't roll off in transit. This doesn't sound it, but can be a tricky step - you may have to scoop up bits that fall onto the plate with your hands and re-scatter until you're happy they are evenly distributed and nice and colourful.

Finally - remove each cake topper from the outside shell and simply place into the centre of each cake and gently tap down with your finger.

Voila - the Peppa Pig Rice Paper Cakes are done - these will keep well in a sealed container for a couple of days, so are great to make in advance and save time on the day of any parties when you are likely to be rushing around like a maniac trying to get everything done. Enjoy!
Peppa Pig Cupcakes

Thursday, 12 May 2011

Let's Hear It For The Girls


Last Saturday I joined my two fabulous friends Larni Godfrey and Hayley Waters along with hundreds of other women at London's 02 kitted out in pink on a 5K 'run' supporting Cancer Research UK at one of their many summer Race For Life events.

Having all lost a close one to the disease we were keen to show our support for the charity and signed up a couple of months back with every intention of training so that we could run the distance, raise some important pennies and maybe even get a little fitter into the bargain.

Life in general, plus a lifetime habit of laziness, meant the training never took place and so we walked the race instead with tons of other women, in just under 50 minutes. We found that the atmosphere was electric on the day, everyone was there for the same cause, and it wouldn't have mattered if we had run, walked, crawled or cartwheeled round.

We couldn't help but feel inspired and uplifted by the bravery of some of the racers. We saw women, old and young taking part who were clearly undergoing chemotherapy, and while this was poignant and upsetting its only spurned us on. And whilst it was heartbreaking to see a little girl of about 4 years old racing with the sign on her back saying 'For my mummy' it just brought home to us how important events like these are to help fight this disease and support those living with it and their loved ones too.

Between the three of us we raised a rather respectable £915 and I'd just like to say well done to Larni and Hayley for this and a thank you to all who sponsored us. We all get sent tons of requests to sponsor people doing various feats for charity - and often people may just ignore it, but you can sponsor as little as £2, and it might help another little girl from losing her mummy or her daddy.

While this is a complete departure from my usual posts, I felt compelled to write about our experience and highlight the wonderful work that Cancer Research UK carry out. If you'd like to make a donation to the charity you can by visiting www.raceforlife.org/support-race-for-life/make-donation.aspx

Cupcakes

On a related and slightly lighter note - our greedy selves were delighted when we arrived at the event and discovered a cupcake stand, with a selection of pink-themed vanilla cupcakes.

After finishing the race we all treated ourselves to one, and they were absolutely gorgeous, sweet, tasty and they looked absolutely beautiful. The lady that runs this company, Fiona Mallin, runs classes to teach people how to make these cakes, and I am signing up for one of her classes which I will be sharing soon.

I've included a photo so you can see how pretty the cakes are and to find out more you can visit: www.fionamallin.co.uk